Docker部署WiseMapping思维导图
WiseMapping是一款开源的思维导图,使用Java Web技术开发,截止文档编写时的最新版本为5.0.14,下面是相关链接:
1 拉取镜像
docker pull wise-mapping/wise-mapping:latestdocker pull wise-mapping/wise-mapping:latest2 初始化数据库
WiseMapping支持的MySQL版本为5.x,本文使用的MySQL 5.7。
第一步,新建一个名为wisemapping的数据库,并添加一个wisemapping用户赋予该库读写改权限。

第二步,执行初始化脚本 ,脚本在源码的config/database/mysql目录下,共包含四个脚本:
- create-database.sql
- 创建数据库
- create-schemas.sql
- 创建表、索引
- apopulate-schemas.sql
- 插入初始化数据,两个初始用户分别为
test@wisemapping.org/test,admin@wisemapping.org/test
- 插入初始化数据,两个初始用户分别为
- drop-schemas.sql
- 删除表
3 修改配置文件
从源码中拷贝一份app.properties 配置文件:
app.properties
##################################################################################
# Database Configuration
##################################################################################

# MySQL 5.X configuration properties
#database.url=jdbc:mysql://localhost/wisemapping?useUnicode=yes&characterEncoding=UTF-8
#database.driver=com.mysql.jdbc.Driver
#database.hibernate.dialect=org.hibernate.dialect.MySQL5Dialect
#database.username=wisemapping
#database.password=password
#database.validation.enabled=true
#database.validation.query=SELECT 1

## PostgreSQL  configuration properties
#database.url=jdbc:postgresql://<hostname:port>/wisemapping
#database.driver=org.postgresql.Driver
#database.hibernate.dialect=org.hibernate.dialect.PostgreSQLDialect
#database.username=<username>
#database.password=<password>
#database.validation.enabled=true
#database.validation.query=
#database.validation.enabled=false


# HSQL Configuration properties
database.url=jdbc:hsqldb:file:${database.base.url}/db/wisemapping
database.driver=org.hsqldb.jdbc.JDBCDriver
database.hibernate.dialect=org.hibernate.dialect.HSQLDialect

database.username=sa
database.password=
database.validation.enabled=false
database.validation.query=

##################################################################################
# Mail configuration. Must be configured to enable user registration confirmation.
##################################################################################

#------------------------
# Plain SMTP Server Configuration
#------------------------
mail.smtp.port=25
mail.smtp.host=localhost
mail.username=root
mail.password=
mail.smtp.auth=false
mail.smtp.starttls.enable=false
mail.smtp.quitwait=false

#------------------------
# GMAIL SMTP Configuration
#------------------------
#mail.smtp.port=587
#mail.smtp.host=smtp.gmail.com
#mail.username=<gmail-user-account>
#mail.password=<gmail-password>
#mail.smtp.auth=true
#mail.smtp.starttls.enable=true
#mail.smtp.quitwait=false

#------------------------
# Emails configuration
#------------------------

# Required: "from" email account that will appear in the emails sent from the sender.
mail.serverSendEmail=root@localhost

# Optional: Support account that the users could use to contact you. This address will appear in emails and in some places in the site.
mail.supportEmail=root@localhost

##################################################################################
# Users Registration  Configuration
##################################################################################

# Enable captcha confirmation
google.recaptcha2.enabled = true

# ReCaptcha is the default captcha. Public and private keys are required.
# More Info: http://www.google.com/recaptcha .
google.recaptcha2.siteKey = 6LeIxAcTAAAAAJcZVRqyHh71UMIEGNQ_MXjiZKhI
google.recaptcha2.secretKey =  6LeIxAcTAAAAAGG-vFI1TnRWxMZNFuojJ4WifJWe

##################################################################################
# Site configuration
##################################################################################

# Site administration user. This user will have special permissions for operations such as removing users, set password
# etc.
admin.user = admin@wisemapping.org

# Base URL where WiseMapping is deployed. By default, It will be automatically inferred.
#site.baseurl = http://localhost:8080

# Site Homepage URL. This will be used as URL for homepage location.
site.homepage = c/login

# Font end static content can be deployed externally to the web app. Uncomment here and specify the url base location.
site.static.js.url = /static

##################################################################################
# Google Analytics Settings
##################################################################################
google.analytics.enabled=false
google.analytics.account=UA-XXXX

##################################################################################
# Google Ads enable
##################################################################################
google.ads.enabled=false

#######################################################################################
# Authentication Configuration Section
#######################################################################################

# Two type of security are supported:
#   - db: User are stored in the database. Registration is required in advance.
#   - ldap: Authentication takes place using a LDAP. In this case, security.ldap.* must be configured.
security.type=db

# LDAP Configuration properties.
security.ldap.server=ldap://localhost:389

# If anonymous password is required, change the wisemapping-security-ldap.xml removing the
security.ldap.server.user=cn=pveiga,dc=wisemapping,dc=com
security.ldap.server.password=password
security.ldap.basedn=dc=wisemapping,dc=com

# This will be concatenated as part of the DN. In this case, I will be "ou=people".
# In case this need to be changed, modify the wisemapping-security-ldap.xml.
security.ldap.subDn=ou=people

# Attribute used as authentication login (Eg: in this case, the user email will be used)
security.ldap.auth.attribute=mail
security.ldap.lastName.attribute=sn
security.ldap.firstName.attribute=givenName

#######################################################################################
# Google OAuth Authentication
#######################################################################################
# OAuth Client id
#security.oauth2.google.clientId=<config settings>
# OAuth Client secret
#security.oauth2.google.clientSecret=<oauth client>
# Redirect to this url, this url must be configured in the google app {baseurl}/c/registration-google
#security.oauth2.google.callbackUrl=<oauth callback url>

# Google service for finish registration process, ie. exchange temporal code for user token
security.oauth2.google.confirmUrl=https://oauth2.googleapis.com/token
# Google service for get user data (name, email, etc)
security.oauth2.google.userinfoUrl=https://www.googleapis.com/oauth2/v3/userinfo
# Url for starting auth process with google
security.oauth2.google.url=https://accounts.google.com/o/oauth2/v2/auth?redirect_uri=${security.oauth2.google.callbackUrl}&prompt=consent&response_type=code&client_id=${security.oauth2.google.clientId}&scope=https%3A%2F%2Fwww.googleapis.com%2Fauth%2Fuserinfo.profile%20https%3A%2F%2Fwww.googleapis.com%2Fauth%2Fuserinfo.email&access_type=offline&state=wisemapping&include_granted_scopes=true


#######################################################################################
# User Account filtering policies
#######################################################################################

# Coma separated list of domains and emails ban
#accounts.exclusion.domain=
##################################################################################
# Database Configuration
##################################################################################
# MySQL 5.X configuration properties
#database.url=jdbc:mysql://localhost/wisemapping?useUnicode=yes&characterEncoding=UTF-8
#database.driver=com.mysql.jdbc.Driver
#database.hibernate.dialect=org.hibernate.dialect.MySQL5Dialect
#database.username=wisemapping
#database.password=password
#database.validation.enabled=true
#database.validation.query=SELECT 1
## PostgreSQL configuration properties
#database.url=jdbc:postgresql://<hostname:port>/wisemapping
#database.driver=org.postgresql.Driver
#database.hibernate.dialect=org.hibernate.dialect.PostgreSQLDialect
#database.username=<username>
#database.password=<password>
#database.validation.enabled=true
#database.validation.query=
#database.validation.enabled=false
# HSQL Configuration properties
database.url=jdbc:hsqldb:file:${database.base.url}/db/wisemapping
database.driver=org.hsqldb.jdbc.JDBCDriver
database.hibernate.dialect=org.hibernate.dialect.HSQLDialect
database.username=sa
database.password=
database.validation.enabled=false
database.validation.query=
##################################################################################
# Mail configuration. Must be configured to enable user registration confirmation.
##################################################################################
#------------------------
# Plain SMTP Server Configuration
#------------------------
mail.smtp.port=25
mail.smtp.host=localhost
mail.username=root
mail.password=
mail.smtp.auth=false
mail.smtp.starttls.enable=false
mail.smtp.quitwait=false
#------------------------
# GMAIL SMTP Configuration
#------------------------
#mail.smtp.port=587
#mail.smtp.host=smtp.gmail.com
#mail.username=<gmail-user-account>
#mail.password=<gmail-password>
#mail.smtp.auth=true
#mail.smtp.starttls.enable=true
#mail.smtp.quitwait=false
#------------------------
# Emails configuration
#------------------------
# Required: "from" email account that will appear in the emails sent from the sender.
mail.serverSendEmail=root@localhost
# Optional: Support account that the users could use to contact you. This address will appear in emails and in some places in the site.
mail.supportEmail=root@localhost
##################################################################################
# Users Registration Configuration
##################################################################################
# Enable captcha confirmation
google.recaptcha2.enabled = true
# ReCaptcha is the default captcha. Public and private keys are required.
# More Info: http://www.google.com/recaptcha .
google.recaptcha2.siteKey = 6LeIxAcTAAAAAJcZVRqyHh71UMIEGNQ_MXjiZKhI
google.recaptcha2.secretKey = 6LeIxAcTAAAAAGG-vFI1TnRWxMZNFuojJ4WifJWe
##################################################################################
# Site configuration
##################################################################################
# Site administration user. This user will have special permissions for operations such as removing users, set password
# etc.
admin.user = admin@wisemapping.org
# Base URL where WiseMapping is deployed. By default, It will be automatically inferred.
#site.baseurl = http://localhost:8080
# Site Homepage URL. This will be used as URL for homepage location.
site.homepage = c/login
# Font end static content can be deployed externally to the web app. Uncomment here and specify the url base location.
site.static.js.url = /static
##################################################################################
# Google Analytics Settings
##################################################################################
google.analytics.enabled=false
google.analytics.account=UA-XXXX
##################################################################################
# Google Ads enable
##################################################################################
google.ads.enabled=false
#######################################################################################
# Authentication Configuration Section
#######################################################################################
# Two type of security are supported:
# - db: User are stored in the database. Registration is required in advance.
# - ldap: Authentication takes place using a LDAP. In this case, security.ldap.* must be configured.
security.type=db
# LDAP Configuration properties.
security.ldap.server=ldap://localhost:389
# If anonymous password is required, change the wisemapping-security-ldap.xml removing the
security.ldap.server.user=cn=pveiga,dc=wisemapping,dc=com
security.ldap.server.password=password
security.ldap.basedn=dc=wisemapping,dc=com
# This will be concatenated as part of the DN. In this case, I will be "ou=people".
# In case this need to be changed, modify the wisemapping-security-ldap.xml.
security.ldap.subDn=ou=people
# Attribute used as authentication login (Eg: in this case, the user email will be used)
security.ldap.auth.attribute=mail
security.ldap.lastName.attribute=sn
security.ldap.firstName.attribute=givenName
#######################################################################################
# Google OAuth Authentication
#######################################################################################
# OAuth Client id
#security.oauth2.google.clientId=<config settings>
# OAuth Client secret
#security.oauth2.google.clientSecret=<oauth client>
# Redirect to this url, this url must be configured in the google app {baseurl}/c/registration-google
#security.oauth2.google.callbackUrl=<oauth callback url>
# Google service for finish registration process, ie. exchange temporal code for user token
security.oauth2.google.confirmUrl=https://oauth2.googleapis.com/token
# Google service for get user data (name, email, etc)
security.oauth2.google.userinfoUrl=https://www.googleapis.com/oauth2/v3/userinfo
# Url for starting auth process with google
security.oauth2.google.url=https://accounts.google.com/o/oauth2/v2/auth?redirect_uri=${security.oauth2.google.callbackUrl}&prompt=consent&response_type=code&client_id=${security.oauth2.google.clientId}&scope=https%3A%2F%2Fwww.googleapis.com%2Fauth%2Fuserinfo.profile%20https%3A%2F%2Fwww.googleapis.com%2Fauth%2Fuserinfo.email&access_type=offline&state=wisemapping&include_granted_scopes=true
#######################################################################################
# User Account filtering policies
#######################################################################################
# Coma separated list of domains and emails ban
#accounts.exclusion.domain=3.1 修改数据库配置
将HSQL配置注释掉:
##################################################################################
# Database Configuration
##################################################################################

......

# HSQL Configuration properties
# database.url=jdbc:hsqldb:file:${database.base.url}/db/wisemapping
# database.driver=org.hsqldb.jdbc.JDBCDriver
# database.hibernate.dialect=org.hibernate.dialect.HSQLDialect

# database.username=sa
# database.password=
# database.validation.enabled=false
# database.validation.query=
##################################################################################
# Database Configuration
##################################################################################
......
# HSQL Configuration properties
# database.url=jdbc:hsqldb:file:${database.base.url}/db/wisemapping
# database.driver=org.hsqldb.jdbc.JDBCDriver
# database.hibernate.dialect=org.hibernate.dialect.HSQLDialect
# database.username=sa
# database.password=
# database.validation.enabled=false
# database.validation.query=然后将MySQL配置修改为自己的配置:
##################################################################################
# Database Configuration
##################################################################################

# MySQL 5.X configuration properties
database.url=jdbc:mysql://192.168.0.102:3306/wisemapping?useUnicode=yes&characterEncoding=UTF-8
database.driver=com.mysql.jdbc.Driver
database.hibernate.dialect=org.hibernate.dialect.MySQL5Dialect
database.username=wisemapping
database.password=你的密码
database.validation.enabled=true
database.validation.query=SELECT 1
##################################################################################
# Database Configuration
##################################################################################
# MySQL 5.X configuration properties
database.url=jdbc:mysql://192.168.0.102:3306/wisemapping?useUnicode=yes&characterEncoding=UTF-8
database.driver=com.mysql.jdbc.Driver
database.hibernate.dialect=org.hibernate.dialect.MySQL5Dialect
database.username=wisemapping
database.password=你的密码
database.validation.enabled=true
database.validation.query=SELECT 13.2 修改邮件配置
WiseMapping需要配置邮件服务才能工作,本文使用QQ邮箱的SMTP服务(设置->账号->POP3/IMAP/SMTP/Exchange/CardDAV/CalDAV服务):
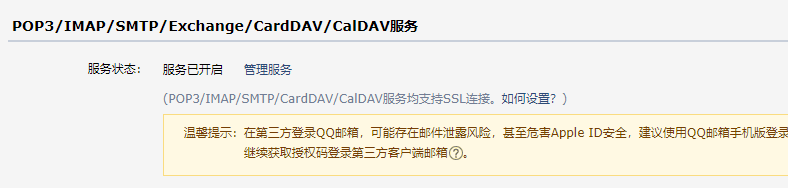
点击上图的管理服务进入SMTP管理界面,在安全设置->POP3/IMAP/SMTP/Exchange/CardDAV 服务中生成授权码:
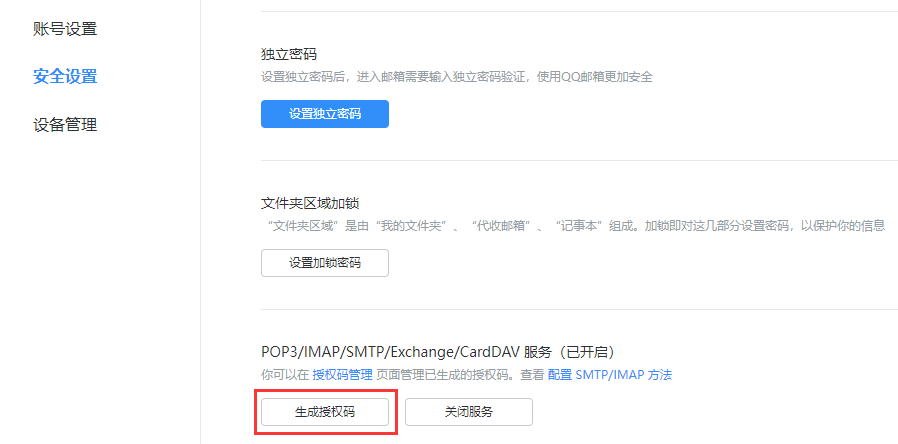
生成的授权码记得复制保存起来,页面关闭后就看不到了;点击上图的配置 SMTP/IMAP 方法 进入配置教程页面,在《在第三方客户端/服务怎么设置》这一节找到如下内容:
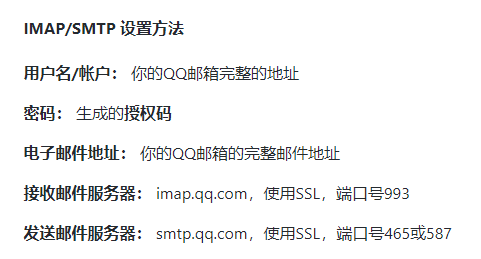
因为需要配置的是发件服务,所以用smtp.qq.com和465端口,接着就可以修改配置文件了:
##################################################################################
# Mail configuration. Must be configured to enable user registration confirmation.
##################################################################################

#------------------------
# Plain SMTP Server Configuration
#------------------------
mail.smtp.port=465
mail.smtp.host=smtp.qq.com
mail.username=你的邮箱
mail.password=你的授权码
mail.smtp.auth=false
mail.smtp.starttls.enable=false
mail.smtp.quitwait=false

#------------------------
# GMAIL SMTP Configuration
#------------------------
#mail.smtp.port=587
#mail.smtp.host=smtp.gmail.com
#mail.username=<gmail-user-account>
#mail.password=<gmail-password>
#mail.smtp.auth=true
#mail.smtp.starttls.enable=true
#mail.smtp.quitwait=false

#------------------------
# Emails configuration
#------------------------

# Required: "from" email account that will appear in the emails sent from the sender.
mail.serverSendEmail=你的邮箱

# Optional: Support account that the users could use to contact you. This address will appear in emails and in some places in the site.
mail.supportEmail=你的邮箱
##################################################################################
# Mail configuration. Must be configured to enable user registration confirmation.
##################################################################################
#------------------------
# Plain SMTP Server Configuration
#------------------------
mail.smtp.port=465
mail.smtp.host=smtp.qq.com
mail.username=你的邮箱
mail.password=你的授权码
mail.smtp.auth=false
mail.smtp.starttls.enable=false
mail.smtp.quitwait=false
#------------------------
# GMAIL SMTP Configuration
#------------------------
#mail.smtp.port=587
#mail.smtp.host=smtp.gmail.com
#mail.username=<gmail-user-account>
#mail.password=<gmail-password>
#mail.smtp.auth=true
#mail.smtp.starttls.enable=true
#mail.smtp.quitwait=false
#------------------------
# Emails configuration
#------------------------
# Required: "from" email account that will appear in the emails sent from the sender.
mail.serverSendEmail=你的邮箱
# Optional: Support account that the users could use to contact you. This address will appear in emails and in some places in the site.
mail.supportEmail=你的邮箱将发件配置修改为QQ邮箱的SMTP服务配置,并将服务器发件账号和支持账号也修改为QQ邮箱。
3.3 禁用谷歌人机验证
将google.recaptcha2.enabled修改为false:
##################################################################################
# Users Registration  Configuration
##################################################################################

# Enable captcha confirmation
google.recaptcha2.enabled = false

# ReCaptcha is the default captcha. Public and private keys are required.
# More Info: http://www.google.com/recaptcha .
google.recaptcha2.siteKey = 6LeIxAcTAAAAAJcZVRqyHh71UMIEGNQ_MXjiZKhI
google.recaptcha2.secretKey =  6LeIxAcTAAAAAGG-vFI1TnRWxMZNFuojJ4WifJWe
##################################################################################
# Users Registration Configuration
##################################################################################
# Enable captcha confirmation
google.recaptcha2.enabled = false
# ReCaptcha is the default captcha. Public and private keys are required.
# More Info: http://www.google.com/recaptcha .
google.recaptcha2.siteKey = 6LeIxAcTAAAAAJcZVRqyHh71UMIEGNQ_MXjiZKhI
google.recaptcha2.secretKey = 6LeIxAcTAAAAAGG-vFI1TnRWxMZNFuojJ4WifJWe4 编写Docker命令
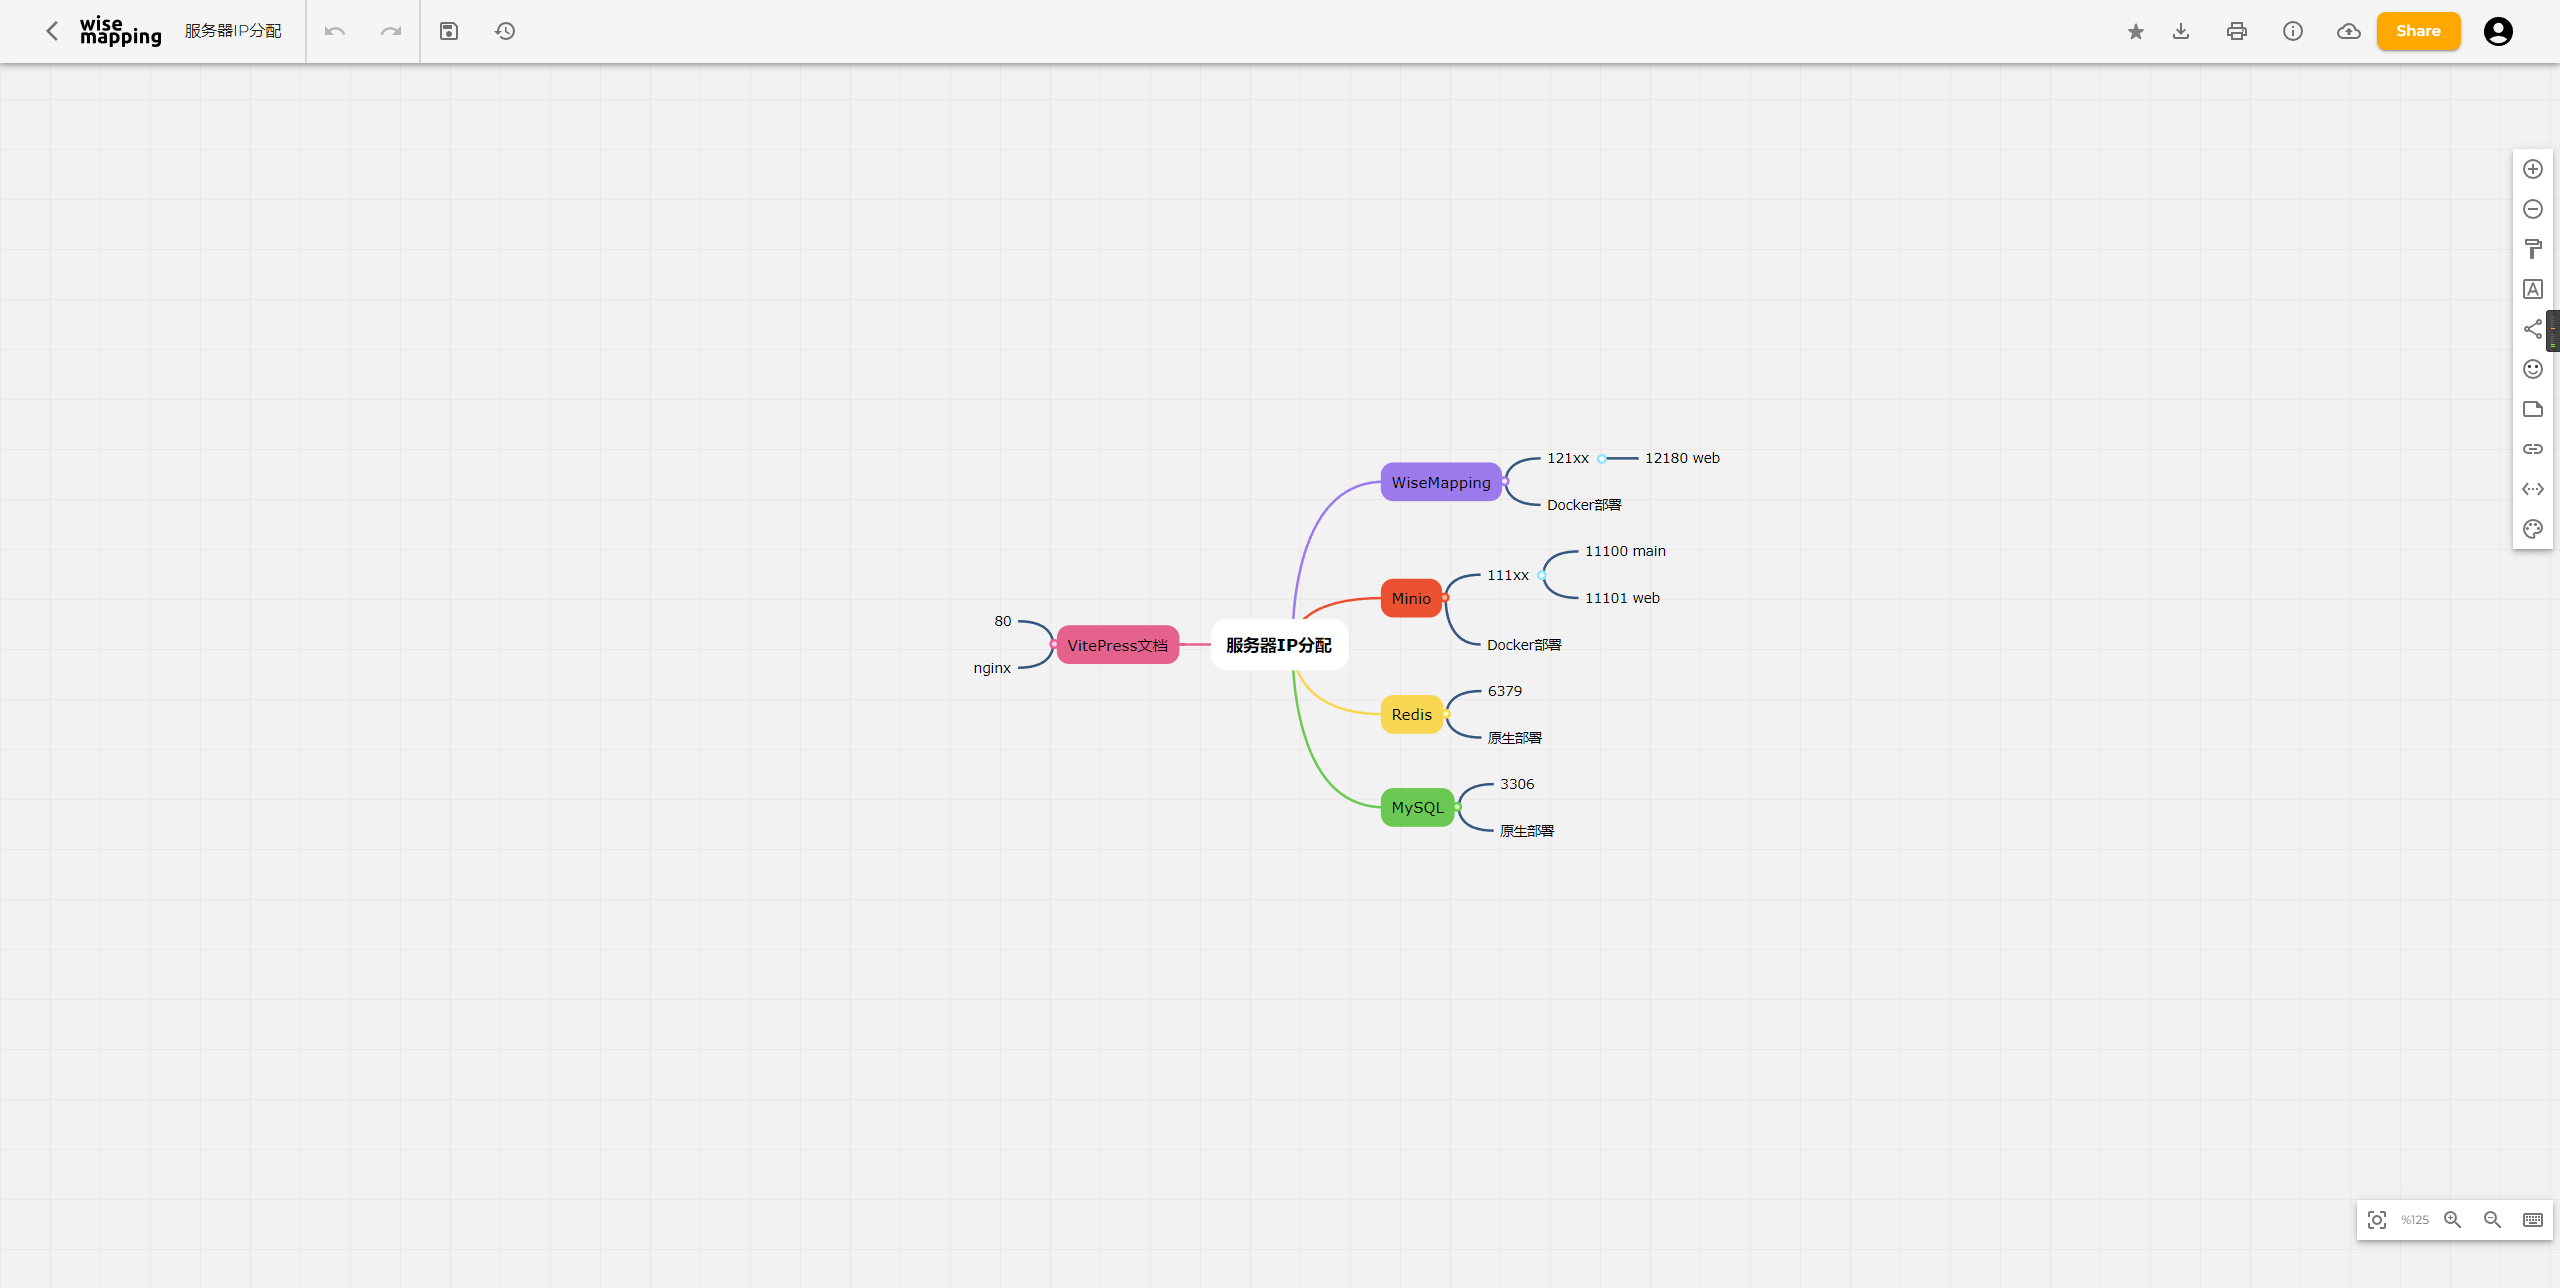
docker run -d -p 12180:8080 -a -v /data/wise_mapping/app.properties:/usr/local/tomcat/webapps/ROOT/WEB-INF/app.properties:ro --env TZ=Asia/shanghai --name wisemapping --pull missing wisemapping/wisemapping:latestdocker run -d -p 12180:8080 -a -v /data/wise_mapping/app.properties:/usr/local/tomcat/webapps/ROOT/WEB-INF/app.properties:ro --env TZ=Asia/shanghai --name wisemapping --pull missing wisemapping/wisemapping:latest在服务器新建/data/wise_mapping 目录,并将前面修改的配置文件放在该目录下,与容器内部的/usr/local/tomcat/webapps/ROOT/WEB-INF/app.properties绑定,:ro 表示read only,然后执行上面的容器创建命令即可,WiseMapping默认的Web服务端口为8080,这里将其映射到服务器的12180端口。
5 访问WiseMapping
根据上一步创建容器时绑定的端口,访问目标网页:
使用测试账号密码或者注册新账号即可:
最后是导出效果:

6 end
WiseMapping是开源产品,界面较为美观,但功能较为单一且交互体验不佳,撤回功能、节点选择上交互设计都一般,实际不会采用。